Pages

28 February 2014

Sweet Peacock & Water decals

These gorgeous flower water decals are another item I received from Born Pretty Store for review (disclosure policy).
I'm really liking reviewing their stuff simply because I would be buying it anyway! They're definitely is a bit of pressure to make my photos and mani look prefect since I am reviewing, but I've found a good spot in the house with some natural light that's been working really well. Plus I rather do few manis if they look awesome rather than a bunch that look like crap.

Anyway! I used two coats of Orly Sweet Peacock. It's super pretty, but Orly hates me. I've tried a few polishes before, but have given away/traded off/sold them all except one glitter because the formula just isnt compatible for me. The two coats were thin yet took FOREVER to dry even with fast dry top coat. Then this gorgeous mani chipped the next day :( it's lasting well on my toes though.


The decals are super easy to use. Just cut out whatever flower you want to use (I trim pretty close to it), take off the front plastic protection, place in a small bowl of water, and wait a bit. The decal will usually separate after 30 seconds to 1 minute. Use tweezers to gently place the decal on your nail. If you've done top coat before this step, your nail surface will be slippery and you can easily slide the decal around. Then let dry a bit, and add top coat!
I didn't do the top coat step prior to my decals this time. So I had a few minor places where the vines of the flowers went off the color base. I used my clean up brush and acetone and was able to clean that right up! I was very pleasantly suprised to find that out!!


I love use water decals sooooo much! I have a few I've purchased myself in the past. They are simple to use and make manis look so nice.
Don't forgot to use my discount code if you want to get these decals (or anything else) from Born Pretty Store.


23 February 2014

Neon Skittles

We've had some crazy weather here lately (snow, rain, warm weather, cold weather, sunny, cloudy) so I was craving something bright. I recently got Glam Polish Freak Show in a swap plus some neon green star studs from Born Pretty Store to review (disclosure policy) so I decided to combine things for a bright skittle!

On my middle, ring, and thumb fingers, I applied three coats of Glam Polish Freak Show. Make sure you add some good top coat to smooth this down. I added Sinful Colors Why Not and the star studs to my ring and pinkie fingers. The star studs are nice are small so I can add a few to even my small nails. They lay flat too. I'm really happy with them.


On my index finger, I did a base of Wet n Wild French White Creme. Then I did a water marble on top using Sinful Colors Why Not and China Glaze I'm With The Lifeguard. This is one of my better water marbles, but you can still see some base coat peeking through.

Why Not stains a bit so you can see some of that on my index and pinkie fingers.

I adore how this came out (even though hubby wasn't impressed :P). I may end up applying gel top coat to try to prolong this mani.

AAAAAANNNNNDDDDDD! Here's a 10% off code for Born Pretty Store for my followers. Enjoy!


20 February 2014

Wicked Witch of the East

Just a quickie post inspired by the Wicked Witch of the East


Glam Polish Evanora (two very nice easy coats)
Savvy Ruby Slippers (two coats)

18 February 2014

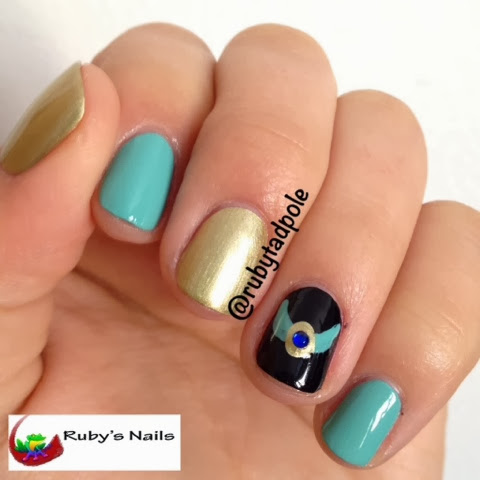
Princess Jasmine Inspired Nails

This super simple mani was inspired by Princess Jasmine from Disney's Aladdin.


Colors used:
China Glaze For Audrey
Wet n Wild Black Creme
Barry M Gold Foil

14 February 2014

Valentine's Day: Pink and Grey

Just a quick post today. I have company coming over today, tomorrow, and Monday plus we're going out tomorrow and Sunday! Hence the crappy cuticles because I've been cleaning, though my husband did do quite a bit last night while I was sleeping as a Valentine's Day gift.


Rimmel Grey Matter
Zoya Shelby
Wet n Wild French White Creme

09 February 2014

Valentine's Day: Skittle mani

I'm not a huge fan of how this turned out, but I'll share it anyway.

I did a base of Wet N Wild French White Creme. On my thumb and pinkie, I added a coat of Wet n Wild Sparked, a pink glitter. It's pretty, but I wish it was more dense.

On the other fingers, I added two coats of Lynderella Mon Petit Chou Chou. It's soooo sheer! This is layered over white, and you can see how sheer it still looks. Not a fan.

I used Migi Nail Art Pens to do the details on my ring finger.


This mani came off the next day. It just didn't work for me.

07 February 2014

Valentine's Day: Cupid

I plan on trying to do as many Valentine's Day manis as I can before the day! I might post a few after because I have soooo many ideas!

This is the mani I'm currently wearing, but I have another that I did earlier this week that I'll post over the weekend. Then I'm hoping to fit in two more: one for next week and one for the actual day of (or rather the day after since my husband works on Valentine's Day and we're gonna go out the next day while my amazing mom watches our wee one).

Anyway, onto this mani! I've mentioned the Baby Center group before, and our threadly challenge was to do nail transfers. They could be simple store bought stickers/decals or you could make your own using the freezer bag/parchment paper/page protector method. I chose to make my own using the advanced stamping method.


I used all Zoya polishes for this other than my stamping polish. I started with a base of Zoya Dove and added the hearts/dots using Zoya Sooki (red), Zoya Shelby (pink), and Zoya Kieko (purple).
To do the stamp, I started the process like normal using Konad Black and Cheeky Jumbo 3 (European Romance). I left the stamp on my stamper and let it dry for a bit. Then I carefully filled in the hearts and let that dry. Next I added a thick layer of top coat and let it dry for probably about 2 hours. After applying my base coat on my nails and letting it dry a bit, I gently peeled my stamp off the stamper, trimmed it, added top coat to my nail, applied the decal and gently pushed it down! Whew! I cleaned up the edges (very easy with acetone and a small brush since it's all nail polish), and added more top coat. It sounds hard, but it was pretty easy!
With having a baby, this was easy to do since the process could be easily spread out. I definitely plan on using this technique more!

03 February 2014

Valentine's Day: Leopard Skittle

I've been really wanting to do a Valentine's Day leopard print, more specifically a heart shaped one. I decided to skittle it up on this mani.

A friend of mine lent me her gel system to use as well so I did a gel sandwich (gel bad coat and cure, regular polish and top coat, dry overnight, gel top coat and cute). I'll post pictures later to show you a wear test :)


I used two coats each of Zoya Keiko (purple) and Zoya Shelby. For my ring finger, I used three coats of Glam Polish Unicorn Sparkles! The black accents were added using Wet n Wild Black Creme.