Showing posts with label Barry M. Show all posts

27 August 2018

Matte and Shiny Nail Art

Hello all! Sorry it's been a minute :) We've been super busy with back to school prep, appointments, car troubles, and fall craft fair prep for me. I will have some back logged posts coming at you today and the next few days.


For today's manicure, I did a mixed finish manicure. I really like how this turned out.


After applying Zoya Lidia (purple), I applied a fast dry top coat and then added Zoya's matte top coat on that. Then I stamped on top using Barry M Razzle Dazzle and the stamping plate below. To keep the mixed finish effect, I left the manicure as that.
I will note that the stamping did flake off a bit since it wasn't protected with top coat, but the overall look was totally worth it.

On my pinkie finger, I just applied Barry M Razzle Dazzle and top coat.


17 August 2018

Barry M Holographic Molten Metal

My sister-in-law lives in Ireland and recently visited us in the States. I often have her bring me back Barry M polishes because they are nice colors, are cheap there, and hard to get here.

She brought me back 3 polishes, and today I have two of them from the Holographic Molten Metal Collection.


First I have Holopgraphic Moon. For a lighter color polish, it went on nicely in 2 coats. It's a lovely pinky nude and would be very appropriate for professional situations.


Holographic Flare is by far my favorite of the two (hello, green!). It also took only 2 coats, and the holographic is intense. I was even getting the effect inside in lower lighting which is awesome.


28 May 2018

Copper Gold Butterflies

For today's mani, I went with a simple butterfly style mani. I used Zoya Blu for my index and middle fingers. It's a pastel blue and suprisingly went on well in 2 coats! The copper-y gold color is Barry M Copper Mine. I used it with the advanced stamping technique to add in some color to the butterflies.


And I had to share something from my other hobby, crochet! I just finished these adorable butterflies. The pattern is from one of my favorite pattern designers, Spin a Yarn Crochet. 


07 May 2018

Disney Up! Inspired Nail Art

I was browsing Disney manicure ideas on Pinterest (my favorite place to find new nail art ideas!) and found some super cute ones inspired by the Disney movie Up. I love that movie, and the nail art looked cute and easy to do.
For today's manicure, I also have a photo tutorial so be sure to scroll down to check it out.


1. Start off with clean nails and apply your base coat. I use Glisten & Glow Base Coat.


2. Next apply your sky color. I'm using 2 coats of Barry M Blueberry.


3. Add clouds using a white polish and your dotting tool.


4. Create overlapping dots of all different colors for your balloons. I used acrylic paint for my balloons, but feel free to use nail polish.


5. Draw white lines coming from your balloons. They don't have to be perfect.
6. Let dry for a bit, and add a thick layer of top coat.


05 March 2018

Green Mani March: Day 2

Welcome to day 2 of my green mani theme for March.

I love doing skittles style manis. I tend to stick to simpler skittles designs which means they are usually pretty fast to do. They also use quite a few polishes which is great because I don't like having untrieds (it spikes my anxiety!) plus I can feature a couple at a time which is especially great for larger collections!

Today's mani features 3 green polishes (and 1 non-green polish).


For this mani, I used Barry M Black Pistachio, China Glaze Re-fresh Mint, and Dollish Polish 1-Up.


Barry M Black Pistachio is a very dark green polish. It looks almost black, especially in my photos since I took them on a cloudy day.

China Glaze Re-fresh Mint is a super light, dusty mint green. I was expecting 3 coats, but it went on in just 2!

Dollish Polish 1-Up is, I believe, discontinued. It's most green hex glitters with some white matte hex glitters and white matte bar glitter. Any other glitter polish would work with this look as well. This mani is a great way to feature any glitter polish you have.

18 July 2014

Space-y Blue Skittles with MoYou London

What's that? Skittles in the title again! Well, at least I tried to get creative with the first half ;)

This mani is sort of a combination of a few different things: wanting to use and feature Dollish Polish Expecto Patronum again as well as wanting to use some more of my new MoYou London images.


I started with a base of Dollish Polish Expecto Pantronum first. I used 2-3 coats.
To jazz it up a bit, I freehanded some tips using Barry M Silver Foil and added on some square blue rhinestones.


The images are stamped with Barry M Silver Foil as well and are from MoYou Sci-Fi 03. It's such a cute plate!!!! See????

(Image courtesy of MoYou London)

I love all of the images on there and need to find some time to play around with them. Advanced stamping, on top of galaxy nails, oh the possibilities!!!!


14 July 2014

Monday Mani: Different Color on Each Nail

In the past, I've mentioned Monday Manis at Polish-Aholics Anonymous on Facebook. Well, they've been coming back!
This week, the voted in theme is to have every nail be a different color. We agreed that it only needed to be each nail on one hand, not all ten digits.
I had a few ideas in mind and had a hard time narrowing it down.


I ended up going with a mani using only (well, mostly) ManGlaze polishes. Starting at the thumb, the colors are Santorum, Fuggen Ugly, Fatty's Got More Blood, Nawsome Sauce, and ILF. The dots are Barry M Gold Foil


When I did this mani, I used the matte sandwich technique to help it last longer.
I applied two coats of each matte polish, then one coat of Rica Glossy Glam. Let dry. Then apply one more coat of your matte polish. I wore this mani for only two days, but I only had a tiny chip. That's good wear time for a matte mani and for me as well! I'm super hard on my nails.

And here's a bonus pedi I did.


07 July 2014

Negative Space Skittles

Negative space manis are everywhere lately, aren't they? I'll admit, I wasn't a big fan at first. I still don't like some of them (I'm not a fan of visable nail line so that needs to be mostly covered for my personal taste), but they have really grown on me!
Plus if you skip a base coat, they're super fast to do especially for tape manis. And that's part of what I did for today's mani!


I laid down a base coat on all but the index and pinkie fingers so I wouldn't have to worry with dry time and tape.

I painted the thumb and middle with one coat of Barry M Pomegrante. I used nail vinyl straights to block off a section and painted on Milani Fresh Teal. For the ring finger, I combined the two colors to make flowers and added Barry M Silver Foil dots in the centers.


I topped the whole mani with Rica Glossy Glam. I just bought the top coat to try. It's thinner than Seche Vite (which I normally use) so I did have a tiny bit of dragging from not floating enough. It did dry quickly. I didn't keep this mani on long enough to see if shrinkage would occur, but I will with the next one.

02 June 2014

June Nail Art Challenge, Day 1: Sky

Over on Instagram, there's a pretty popular monthly nail art challenge.


What's great about this one is that it's spread out so much more easily doable. Plus the hashtag makes linking nail art doers easier than I think than blogging.

I posted mine yesterday on Instagram, but didn't have a chance to blog yet so here is my day 1!

I thought about going literal with clouds, but I've seen lots of daisy-like flowers and tutorials on Instagram that I've been loving so I went with that.

I only use nail polish for this design. Base is Barry M Blueberry. After topping the design with top coat to dry, I added a coat of Essie Matte About You. It does sometimes leave random white dots which can be a pain.

07 May 2014

Shiny Star Mani and Born Pretty Store Review

Hey all! I'm back! I really needed that break and I'm feeling much better about things from the blogging end. I see a lost a few followers too, oh well!

Today I have a review from Born Pretty Store of two different items (disclosure policy). Today I'm reviewing some gold studs and loose glitter.

I decided to use the glitter a bit differently and made star decals (check out my Instagram @rubytadpole for a little tutorial on how I did this!). I layered those and the gold studs on top of Barry M Blueberry. I loved how it turned out and the stud stayed on surprisingly well through diaper changes and all that.


Remember Born Pretty Store has free shipping everyday! Use the code below for 10% off


07 April 2014

Sally Girl Brainy

When I went to Sally Beauty a bit ago, I browsed their Sally Girl mini polishes. They have some neat colors sometimes, and they're only like $1 or so.

When I saw Sally Girl Brainy, I KNEW I needed it because it looks just like Deborah Lippmann Mermaid Dream.

I used two coats for this mani, I think (it's been awhile). I also used Barry M Gold Foil and nail vinyls for the details. I loved how it turned out, and the wear time was pretty good too!


30 March 2014

Illamasqua Grab Negative Space Mani

I've been seeing negative space manis all over Instagram lately. I wanted to try out my own design and went with something simpler.


First I painted a base coat. Then I taped off the space I wanted naked or negative. I painted the remaining space with Illamasqua Grab. I'd recommend using a one coater for this part.

After I peeled up the tape, I used a small brush and Barry M Silver Foil to freehand the lines. Other than messing up my pinkie a bit, it turned about really well! It was surprisingly easy to do too! 

05 March 2014

Spring Green Flowers

Is spring here yet?!? We just got more snow over the weekend and yesterday here in the great white north. And Sunday it's time to change the clocks for Daylight Savings Time. It does not feel like spring!!

But my hands do! I usually don't reserve certain colors for each season, but flowers are definitely a spring thing.


Colors used
SpaRitual Eye of the Beholder (two easy coats)
White acrylic paint
Barry M Gold Foil

18 February 2014

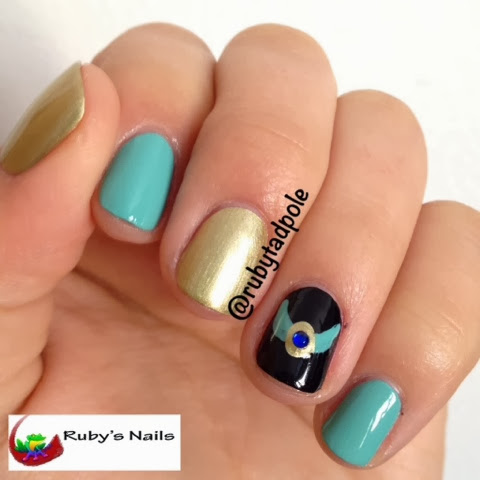
Princess Jasmine Inspired Nails

This super simple mani was inspired by Princess Jasmine from Disney's Aladdin.


Colors used:
China Glaze For Audrey
Wet n Wild Black Creme
Barry M Gold Foil

26 January 2014

Pastel Galaxy

I don't know if any moms read my blog, but if you are a mom you just migth have heard of the Baby Center website. They have tons of information about babies and kids plus several chat boards. One of the boards I belong to has started a nail board that is going very strong! (Shout out to my BHB ladies!)
What's great about that is that we understand time restraints since we are all moms. We're all super supportive of each other which can be rare both in mom groups and the nail polish community. It's a neat little haven.

Anyway, we've decided to do weekly challenges. We get one theme for the week. Again as moms, getting a whole week to do a challenge works great! This week's theme is galaxies. I've done regular and Northern Lights ones. Today I decided to go with another "new" one and do pastel galaxy nails.


I followed a few different tutorials for this one and made it my own. It's not as pastel as other pastel galaxy manis, but I like some of the pops of dark colors.

I used a crap ton of polishes too:
Base is two coats of Sinful Colors Candy Coated.
I added the galaxy using Wet n Wild French White Creme, Barry M Blueberry, Zoya Pippa (yellow), Sinful Colors Fig, A-England Lake of the Lake (purple holographic), Zoya Pippa (pink), Revlon Minted (mint green that was mostly used to tone down purple base as Minted was pretty sheer), and Nubar Absolute (very lightly sponged to add the shimmery effect).

12 January 2014

Spring-y Cloud Mani

Look! Another blog post from me, lol!

The little man took a super long morning nap today and then was playing so nicely by himself that I snuck a mani in.


This is only my second cloud mani, and I really need to do more. They look great and let you incorporate a few untrieds (in this case, 2).

For this mani, I used OPI My Boyfriend  Scales Walls (my friend and I randomly found OPIs in the dollar section at Target for $4 each! I only got this one though), SpaRitual Eye of the Beholder, and Barry M Blueberry.

31 December 2013

Happy New Year!

I don't have anything special going on this year for New Year's Eve. We're not really party people (like going out), and with a one year old it's not so easy to have people over that late or to go to someone else's house. My husband is working until 9pm today as well. I think when he gets home, I'll make a ginormous batch of stove top popcorn and we'll watch some Doctor Who (I'm all caught up; he's on Series 5 still).

Anyway! I still did some simple New Year's Eve nails just for fun :)

Colors used: Barry M Gold Foil and Pure Ice Black Crackle


27 November 2013

Double Challenge Day featuring Snow Man Nail Art

Today's challenge for the Polish-Aholics Anonymous Winter 2013 Challenge is Inspired by a Holiday Movie. I'm also participating in the Nail Polish Canada 2013 Holiday Nail Art Challenge. The first week's theme is Snow. I decided to combine the two ideas and did Frosty the Snowman nails.

I was inspired by a post I saw on Pinterest and created this.


Base: Wet N Wild French White Creme and Sally Hansen Glass Slipper
Details: black acrylic paint, Zoya Arizona (orange), Barry M Pomegrante

21 November 2013

Berry & Silver Skittle

Sinful Colors Berry Charm
Wet n Wild Sprinkled with Love
Nail Craze NC02 stamped with Barry M Silver Foil


17 November 2013

Phallic Flowers

Not quite as dirty as the title sounds ;)
Base: Illamasqua Phallic and Barry M Gold Foil
Details: Wet n Wild French White Creme, and studs from Born Pretty Store