28 November 2012

Guest Post: Elanor's Nails

Today's guest post is from Elanor of Elanor's Nails.

*********************************************************************************

Hello! I'm very excited and very honoured to be doing a guest post for Ruby's Nails. Even more so because of the very exciting reasons behind it - huge congratulations to Jessica and her husband on their gorgeous new arrival, Tristan James! As a UK nail blogger, the polish brand that seems to get the most attention from non-UK nail polish fans is Barry M. This is one of the UK's most popular cosmetics brands - it's cheap, it's widely available, and there is a huge range. Barry M Nail Paints usually sell for either £2.99 (or £3.99 for some of the special ones) and are available in Boots and Superdrug, as well as online here.   They bring out all sorts of new collections on a regular basis. What I've got for you today though, is an old favourite. This is Barry M's Vivid Purple. vivid purple 1 
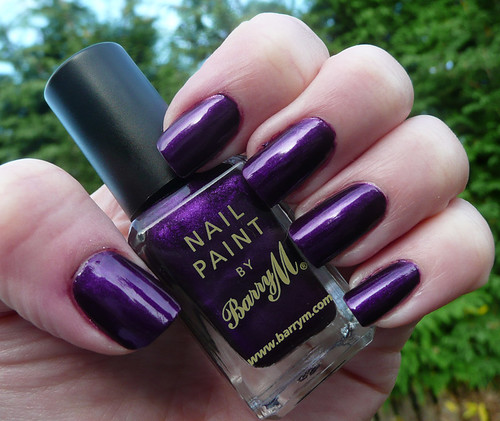
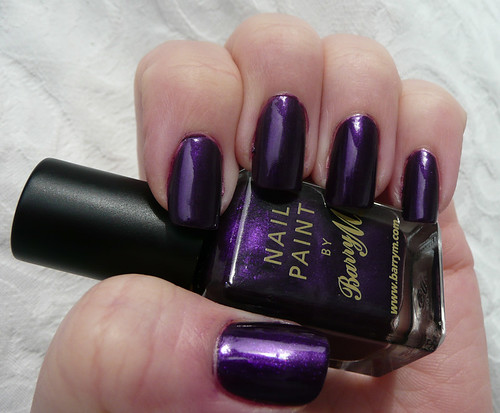
This is two coats, without topcoat. Vivid Purple is one of my favourite Barry Ms. It's a lovely metallic purple, with a sheen that reminds me of beetles, or car paint. I love how easy it is to apply, and how perfectly it dries. What more do you want from a purple? vivid purple 2 I didn't want to stop there though! Another UK brand that gets a lot of attention from non-UK bloggers is Models Own. Their new Mirrorball collection is just stunning - I mean, look! models own mirrorball 2 
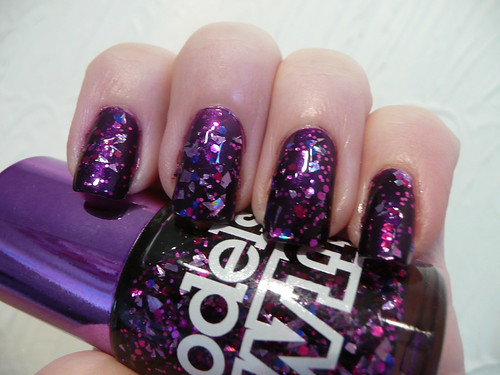
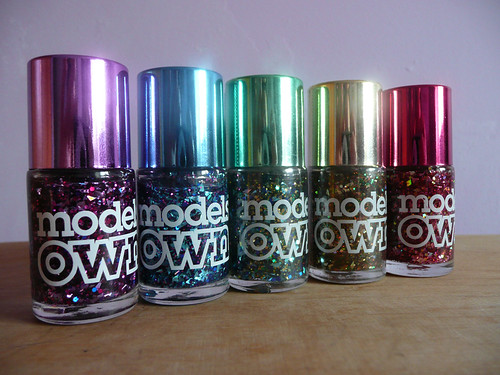
There are five of these, and they are available for £5 in larger Boots stores, or online here.  Today I'm wearing Boogie Nights (the purple one) over Vivid Purple.  boogie nights 4
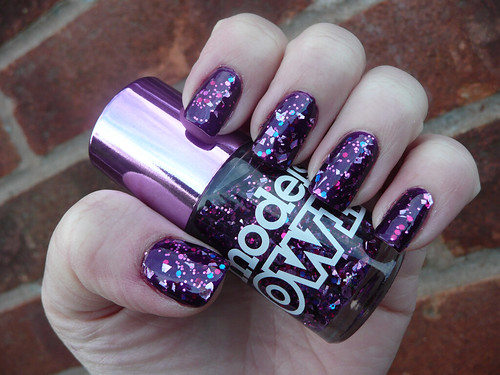
Boogie Nights is a clear base, with five different glitters. There is tiny and medium pink hex glitter, medium bright fuschia glitter, medium hex glitter in a bright blue, and larger, irregular shards of silver holo glitter. This is so ridiculously shiny and sparkly that it's almost impossible to photograph. It definitely catches the light though!
boogie nights 3
This can't really be called a 'coat' of Boogie Nights, as the polish is a bit thick and gloopy. Because there is so much glitter, you do need to dab this on and manipulate the glitter around, rather than painting it on as you would with a creme, or with a finer glitter. The smell is quite strong and unpleasant too, and the finish is very lumpy - you most definitely need a topcoat with this! But I think these are minor irritations when the end result is as good as this!
boogie nights 2 I hope you enjoyed my post - if you're interested in seeing more Barry M, and the rest of the Models Own Mirrorball collection, hop on over to my blog!  Thank you so much to Jessica for letting me do a guest post here, and congratulations again! 

*****************************************************************

Thanks, Elanor! Gotta love those UK polishes!

24 November 2012

Guest Post: Kirsten from Geeky Owl

Today's guest post is from Kirsten. I thought it was particularly suitable for today because here in Wisconsin it's cold today! Our town is having a traditional German Christmas market so we're going to try to check it out today. Santa will be there as well so Tristan will have his first picture with Santa taken as well.

**********************************************************************************************************************************

Hello Ruby's Nails readers! My name is Kirsten and I have a blog over at Geeky Owl. I was asked to do a guest post today to reciprocate a guest post that Ruby's Nails did on my blog this summer, because our lovely blog hostess had a beautiful baby! And of course I jumped at the request! 

So today I bring you my first wintery mani of the season!


Here is a wintry snowy mani! 


I began with my base color of Essence You Belong to Me, two coats. (Sorry that I don't have a photo of it just on it's own) I love this polish. It applies like a dream and is super cheap! Also, it's a perfect icy blue. Win! :)


Next I applied Catrice Godfather of Pearl from the Million Styles Collection. Thank you for polish friends in Europe! I used this polish to add even more icy-ness to the mani. I wanted to create that glistening snow effect. And I think this is perfect for it!


I then stamped using Konad White and two different Bundle Monster plates. For my ring finger I used BM323, which is a full nail snowflake image. For my other nails I used BM319, which is two different snowflakes stamped multiple times.

I really liked how this mani turned out! It reminds me of those snowflakes on the Saks Fifth Avenue building in New York! (click link to be sent to an awesome video of the snowflakes!)

I hope you enjoyed my mani today, I had a lot of fun creating it!

**********************************************************************************************************************************

Thanks so much Kirsten! This mani kinda makes me want it so snow so I can cuddle with my new little man and watch the snow fall.

21 November 2012

Guest Post: Raquel from 9ml Universe


Today's guest post is from Raquel.

**********************************************************************************************************************************

Hey everyone! Raquel from 9ml Universe here! ^^

First of all, I'd to thank Jessica for inviting me to do this, it's not something people ask often, and to me, it's always an honour when they do. So, when Jessica contacted me, she told me she was having a baby and I immediately knew I wanted to do something related to that, but had no idea of what it could be...until I came up with something, but it was in a shade of blue...but what if she was having a girl? :S I asked and got lucky, she was having a boy and I could proceed with the manicure I had in mind. 

What I end up doing doesn't scream baby, I just wanted something pretty and soft in some relatable colours. I went through my stash (really smal at the moment, as most of my nail polish is at my parent's house) and came up with the perfect colour for what I had in mind, Eyeko Rain - a beautiful, soft, grayish blue. I used 2 coats of it and then, using Essence Stampy in silver I made a french manicure and stamped over it with my DRK-B plate. To give it that soft look, I finished it with my favourite matte top coat, Kiko 3 in 1 Mat.


I was really pleased with how this turned out, and I find the colours really suitable for a newborn baby boy. What do you all think?

Once again, congratulations on the new baby, Jessica! Hope everything is going well with both of you.

**********************************************************************************************************************************

Wow, this is beautiful! Thanks, Raquel.

19 November 2012

Guest Post: Rebecca from Polish Etc.

Today's guest post is from Rebecca.

*********************************************************************************

First of all, congratulations to Jessica for her beautiful baby boy! My name is Rebecca from the blog Polish Etc and I was ecstatic to be asked to guest post while she is on maternity leave. I spent several days trying to decide what to show y'all. I have a fairly large stash of nail polishes (somewhere in the hundreds, I refuse to count because then I have to acknowledge how much money I've spent on polish) and could easily show you any color of the rainbow, but I wanted to do something special. I ended up re-creating one of my favorite techniques: the stained glass manicure.
Stained Glass Manicure
The polishes I used were mostly China Glaze (108 Degrees, Red-Curl-Girl, Riveting, Sun-Kissed, Frostbite,  and Blue Sparrow) with one piCture pOlish (Warning) since my collection seems to be lacking a good purple China Glaze (must remedy that...).
Stained Glass Manicure
This technique is really simple to do and easy if you have a steady hand. You simply make dots of color in all different sizes across your nails. Once the dots are dry you use a tiny paintbrush and a dense black polish to outline all of the dots. The effect looks amazingly like a beautiful work of art. 
Stained Glass Manicure
Isn't it gorgeous?
Thanks Jessica for the opportunity to guest post here on Ruby's Nails! I hope you are enjoying this wonderfully special time with Tristan.

*********************************************************************************
OMG!!! This is amazing!!! I must try this when I find some time in the future. Thanks so much Rebecca.

17 November 2012

Guest Post: Nidia with Lit From Within


Today's post is from Nidia.

**********************************************************************************************************************************

Hi, My name is Nidia, and I run a little blog called Lit From Within.  I’d like to thank Ruby for inviting me to be a guest blogger while she welcomes the newest member of her family!

In honor of her special occasion, I want to share with you a special polish.  I love Enchanted Polish holos – they are so beautiful!  One that I wanted for a while was Magical Mystery Tour from their Beatles Collection.  It’s a multichrome with a scattered holo.  The color change is very vivid, and you often get multiple colors showing at the same time; predominately blue, aqua, and purple.  


Sometimes, I can’t bear to cover up such an interesting polish with nail art or glitter, but I still can’t help embellish a little, so I went with studs and rhinestones.  I used 2mm silver studs from the Born Pretty Store and square aqua rhinestones from a multi-colored wheel I bought from Cult Nails.  I set them with Northern Lights from Out The Door, just to give it a little extra sparkle.


I loved how the blue stones looked against the changing blue/purple background.  They might have been overlooked, but the silver studs set them off.  They were fun to wear for a day – I can’t wear 3-d art for very long because I tend to pick it off! 

Pix of the elusive right hand:


Do you like to embellish your polish with 3-d art? 

Thanks again to Jessica, and I hope she’s enjoying her maternity leave!

**********************************************************************************************************************************

Thanks so much Nidia! I love the extra sparkle of Northern Lights on top. I'll need to try that sometime.

15 November 2012

OPI Live and Let Die

Hello, readers! Today you have a post from yours truly.

I did this manicure on the Friday before Tristan was born so I actually wore this when I had him!

For the base, I did 2 coats of OPI Live and Let Die.


There's some great gold flecks in Live and Let Die that my camera refused to pick up. Lucy's Stash has some good pictures of the flecks over at her blog.

Next I decided to have some fun and play around with my nail art tools.  I added on some rhinestones and striping tape. I really love the look that I came up with.


13 November 2012

Guest Post: Carrie creator Sassy Lacquer


Today's guest post is from Carrie.

*********************************************************************************

Hello, I’m Carrie from Reflections, Sassy Nails, and Silly Diversions. (http://kcrephmams.blogspot.com/ ) I am also the creator of Sassy Lacquer. (www.sassylacquer.storenvy.com ) Jessica and I know each other from our wonderful Birthday club. She wanted some guests posts, to prepare her blog for her new arrival, but He cam earlier than expected, and is such a cutie pahtutie! Any how. Onto the polish...
I used China Glaze Jungle Queen as a base, It’s a taupe grey purple, with a subtle purple shimmer in it.
I added Dollish Polish Hylian Princess to it, with an accent of Sally Hansen Big Money.


Today I took my family to a Veteran’s Day parade, and instead of changing my whole mani, I just added some white on my accent nail with Dollish Polish It’s a Me Mario.

Here are some pictures from the parade. I hope you enjoyed my mani and post. Stop by my blog sometime, would ya?


Thanks for Having me guest post Jessica!
~Carrie

*********************************************************************************

Thanks Carrie! Love the mani and the parade looks fun too!

11 November 2012

Guest Post: Kristen from Darling Nails


Today's guest post is from Kristen from Darling Nails

**********************************************************************************************************************************

Hello everyone!  I'm honored to be guest posting here at Ruby's Nails.  I'm excited to help Jessica out as she makes the transition from pregnancy to mommyhood.

I decided to show off a simple stamping design.  I think that this design is the one I see most often from the latest Bundle Monster set: the paisleys.  I really wanted my paisleys to be in silver but I lack a good silver stamp for applying over Zoya Rory (I tried to use China Glaze Platinum Silver, no luck).  Black it was!


This is two coats of Zoya Rory stamped with Sally Hansen Hard as Nails Xtreme Wear Black Out and Bundle Monster plate BM-315.


Rory applied wonderfully and is just a great moderate purple-pink color with a hint of metallic shimmer.  BM-315 is a great stamp that transferred very well from the image plate to my nail with a little help from my go-to stamping black polish Black Out.  Combined, they pair very nicely to create interesting detail on your fingertips.  


Thank you so much for having me as a guest poster, Jessica, and congratulations on the birth of your baby!

**********************************************************************************************************************************

Thanks so much Kristen! Such great looking stamping!

09 November 2012

Update!!

Sorry for the week break since I last posted, but I have very very good reason.


This little guy decided he couldn't wait until November 20th! Tristan James was born on November 5th at 1:24 am weighing 7 lbs 2 oz and measuring 20 inches. I'm in love already.


As I'm sure you all know, things will be super busy with baby (they already are!) so I have some guest posts for you all to enjoy as we get into the swing of things and I love on my little man.

02 November 2012

Smitten Polish ERMAHGERD CANDY CORMS

If you checked out the guest post I did for Elfster, you already got a preview of this polish.  Even though it's technically after Halloween, it's still very festive for fall.

This is my first Smitten Polish, and I really like it. I love glitters in white polishes and just KNEW I needed to buy this one when I saw it.

I ended up using 3-4 coats for this manicure. I was okay with that since, again, I tend to use thinner coats and because white polish often needs more coats than colors.  The formula was really great on this, and the glitter applied nicely: no need to fish around or place the glitter.

Enjoy the pictures!